How to make your own Latex monster masks

Spooky Blue Home | Contact Spooky Blue | Halloween Project Index

Back to page 2 (Making the mold)
Pouring the Latex
If you have successfully removed all the clay without breaking the mold then congratulations!  You did better than I did my first time.  By the way, you can recycle all that clay.  Just pick out any bits of workshop debris and rinse off any residual hand soap.  Good as new and smells pretty, too.

The mold you've just made is a negative image of your sculpture.  What you've made is also called a one-piece mold.  If you had been making a mold of the entire head including the area behind the ears, then you would have had to make a two-piece mold.  I wanted to tackle one thing at a time before I invited extra frustration by complicating matters.  That's why we're only doing the front of the head.

Trivia note:
The busts at Disney's Haunted Mansion are negative images (like our mold) lit from beneath.  When light hits the mold in this way, your brain gets fooled into thinking the image is convex.  When you move your point of view the face in the mold appears to follow you.  This alone might be a better effect than the masks you were going to make!  If your mold holds up after casting is complete, you can use it in your haunt.  Place it high up, light it from beneath (under the chin), and don't let your visitors see the light source. 

Brush the mold with hand soap, and make sure to get inside any deep crevices.  Don't go crazy with it.  The goal is to make the surface slippery when it's time to peel away the cured Latex.  If you use too much soap it can mix with the first coat of Latex and cause your mask not to cure properly.  (sigh...but I learned)
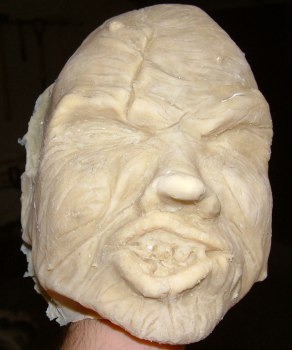
Once the mold (and outside lip) have been coated, brush on your first coat of Latex.  I used a cheap hobby brush.  The first layer is your detail layer, so make sure to get it in all the crooks and nannies (nooks & crannies).  Also bring it out over the lip about 1/4" or so.  This will give you something to hold onto when it's time to peel.

Let the first layer cure for no less than 1 hour then brush on a second layer.  Repeat this process until you have 5 layers, then let the whole thing cure overnight.  If you notice areas that aren't yet cured (still white and squishy) then wait.  You might see this in the tip of the nose or other extremity where the Latex settled.  When everything seems to be dry, slowly peel the mask from the mold. 

My mold had a lot of air pockets.  The air pockets caused some of the surfaces on the face to peel away with the Latex when I pulled my first mask.  I refilled those little holes with bits of clay and was able to cast several masks.  Just kept refilling the holes.  If you work your plaster enough you'll have fewer holes, but if you end up with some it's not the end of the world.

 Continue to page 4 (Painting the dreadful thing)

Spooky Blue Home | Contact Spooky Blue | Halloween Project Index